Piece of Cake: Taking the cake, part two
October 6, 2015
Upon consideration of the finer things in life, such as Netflix and dogs that think they’re lap dogs but are far too big to actually be so, I’ve come to the conclusion that baked goods are the ultimate present. So, why not make them look as such?
After last week, you could’ve left your cake naked and cold — that is a rising trend, after all. However, I tend to be more of a traditionalist, with a few personal twists, which is why I choose to make my own fondant.
Now, fondant is a tricky thing: it’s all about time, temperature and just the right about of one thing or another. But, if you make your own and it turns out the way it should, then you can impress anyone with how awesome you are.
Now, let’s unwrap this present.
Marshmallow Fondant for Decorating
Start to finish: 1 day
Servings: enough to cover 2 cakes
Here’s what you need:
2 16-oz bags of mini marshmallows
10 cups powdered sugar
2-10 tablespoons water
Liquid food coloring
Vegetable shortening
Here’s the fun part:
In a heat-safe bowl, microwave 1 bag of marshmallows and 2 tablespoons of water in 30 second increments until melted, stirring with a wooden spoon in between bursts.
Once melted, stir in as much food coloring as you wish.
Add 1 cup of powdered sugar into the marshmallow mixture and stir carefully. It will start to stick to the sides and to the spoon, but that will be fixed later.
Once the mixture is starting to stick together, top it out onto a surface that has been dusted with powdered sugar.
Gradually knead in approximately 4 more cups of powdered sugar until it holds together.

Test the fondant by pulling a small piece. If it stretched about 2 inches before breaking, then it is good; if it stretches more, then add more powdered sugar. If it stretches less than 2 inches before breaking then knead in a teaspoon of water and try again.
To store, roll the fondant into a ball and coat with about a tablespoon of vegetable shortening. Wrap tightly in plastic wrap and store in a cool place until needed.
When ready to use, roll the fondant out with a powdered sugar-covered rolling pin until it’s about 1/4 inch thick.
Cut the fondant into 1.5-inch-by-5-inch and 1.5-inch-by-6-inch strips.
Using a clean paint brush, brush water onto the short ends of the strips and pinch the ends together, creating a loop.
On a cookie sheet, lay the loops on their side and set into a fridge overnight to dry.
Repeat steps 1-8 with the remaining marshmallows and powdered sugar, rolling the fondant to 1/8 inch instead of 1/4 inch.
Carefully roll the fondant onto the rolling pin and unroll it onto the chilled cake, making sure all of the cake is covered.
Using your hand, carefully move around the sides of the cake and smooth the fondant down, being sure to avoid wrinkles and folds.
Smooth out the top and sides of the cake using your hand, pressing slightly to seal the fondant to the cake.
Using a knife, cut off the excess fondant around the bottom edge of the cake.
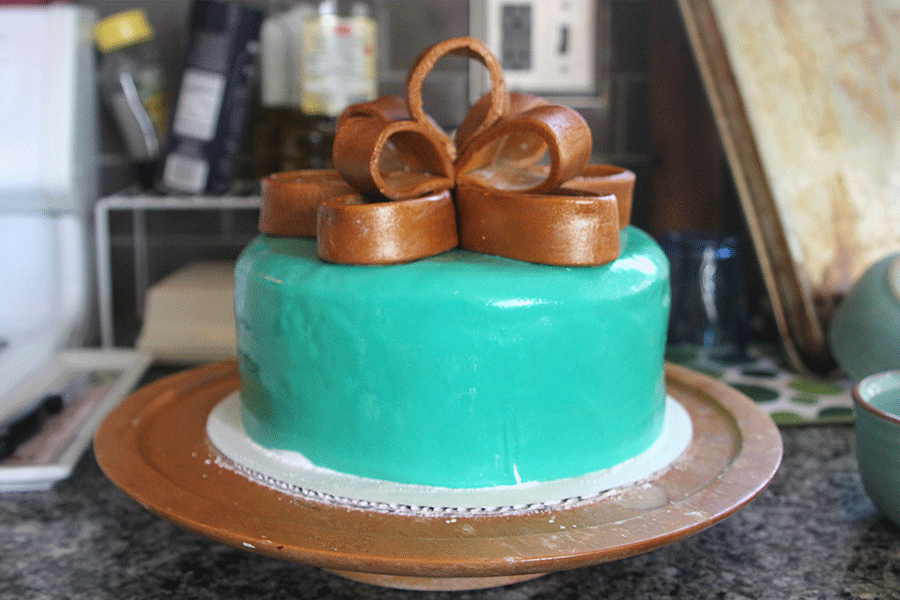
Once the loops of fondant have dried and do not bend, assemble a loop bow on the top of the cake. To do this, take some of the 1.5-inch-by-6-inch loops and arrange them in a circle, securing them onto the top with a bit of water again. On top of those, layer some of the 1.5-inch-by-5-inch loops to create a second layer. Use 1-2 of the smaller loops in the middle, sticking straight up, to create the center of the bow.
Dust any excess powdered sugar off the cake with a pastry brush and transfer the cake to a cake stand.

Here are some tips:
- Try to work in a cool area, or keep a fan on where you work. Fondant cooperates more in a cooler area, since it’s more likely to sweat and tear in a hot climate
- Try different color combinations. I used gold and blue because I love those two colors together, but you can easily change to blue and brown or red and orange if you’d like
- Cut a long strip of fondant the same color as your top bow with a 2-inch width and wrap it around the bottom of the cake to give it a little extra pizzazz.
And finally, it is finished. Two weeks later, it is finished. Not literally of course, just post-wise, but you still get my point. Now you can go surprise your friends and family with this little present. Until next week, fellow foodies.
Junior Laken Wagner has been spending time in the kitchen since she was five years old, where both baking and cooking have always filled her extra time. She enjoys baking more than anything else and can frequently be found decorating cakes or trying out new recipes.


